
One way to put the jars to use is to make snow globes! A great little craft for this time of year.
You'll need:
- Glass jar with lid (preferably one without texture)
- Bottle cap or Crystal Light tub (optional)
- Glitter (white, silver...your choice!)
- Little figurines to put in your snow globe (not wood, paper or metal)
- 8-12" inches of thin ribbon
- Square of cotton fabric (approx. 6"x6")
- Waterproof, quick-drying glue/epoxy (preferably one that dries clear
- Glycerin
- Distilled water (enough to fill your jar)
- Rubbing alcohol or vinegar
1. First thing is to prepare your jar. You want to make sure you completely remove the label & glue. Goo Gone is good for this as is soaking it in hot, soapy water.Then you want to clean the inside of the jar and inside of the lid with rubbing alcohol. I didn't have rubbing alcohol so I used vinegar. It's nature's disinfectant.
2. Place your lid on a scrap of fabric and trace a circle that is about 1/2" wider than the lid. Cut this circle out with pinking shears (if you have them) because that will prevent fraying. If you don't have them then just use fabric that won't fray easily.
3. Now find yourself a bottle cap that will fit inside the lid and still allow you to screw the lid on the jar. This part is optional, but the bottle cap will lift up your figurines a little bit and make sure you don't glue things too far to the edge of the lid.
4. Take your epoxy and glue the bottle cap stage to the inside of the jar lid. The epoxy I used cost $3 and worked great - the only problem was that it dried brown so I had to be extra careful. This epoxy called for lining the bottle cap and the circle on the lid where I was gluing the bottle cap with epoxy and letting it dry for 5 minutes. Then I put the two pieces together - epoxy to epoxy - and let it dry for 5 more minutes.

5. This is the best part - now you get to set your scene! I have a big container of trinkets that I buy from dollar stores and from gumball machines. For this snow globe I chose a baked polymer clay mushroom that I made and a little squirrel.

6. Arrange the trinkets on your bottle cap stage and put the jar over the items to make sure it fits and can screw into the lid. You want to make sure before you glue everything down or you might have some sad faces after all this work.
6. Arrange the trinkets on your bottle cap stage and put the jar over the items to make sure it fits and can screw into the lid. You want to make sure before you glue everything down or you might have some sad faces after all this work.

7. If the jar will fit over the trinkets you are ready to glue. Again, follow the epoxy directions and then glue down your figurines.

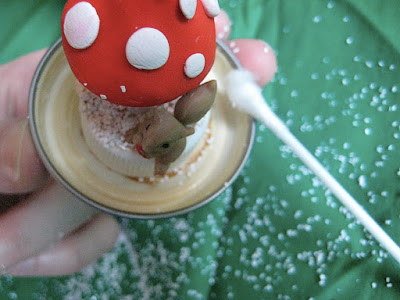
8. Since my epoxy dried brown I wanted to cover that poo color. I added more epoxy and covered it in white glitter so it looks like the ground is snowy. You could also do this with green glitter to make grass or blue glitter to make water.

9. If you do Step 8 you will want to now take a Q-tip and sweep out all the extra glitter so it doesn't get in the way of the lid/jar seal.
10. Now it's time to mix your snowy sky. Pour distilled water almost to the top of the jar. Now add glycerin a teaspoon at a time. The glycerin adds weight to the water so that the glitter will float and swirl and sink. I like to add a lot, but it's best that you add a little at a time until you get your desired swirl. If you are adding heavy objects (sequins, small trinkets, beads) you will need more glycerin.

11. You can always add more glycerin. Let's add in some glitter and see how it swirls. Remember - little at a time and you can always add more.
11. You can always add more glycerin. Let's add in some glitter and see how it swirls. Remember - little at a time and you can always add more.

12. Once you think you got it you can screw the lid onto the jar (but first check that the epoxy on the trinkets is totally dry!). Now stand over the sink and do a test shake and see if you like the way the glitter swirls. It's okay if it drips - if you lose a lot of water you might have to refill.
13. If your swirl is desirable you are ready to seal up this puppy. With the lid on the jar & and the figurines upside-down take your epoxy and seal the space between the lid and jar. I let it dry once and then did a second seal of epoxy.

14. While the epoxy is drying you can work on the lid wrapping. Check to make sure the fabric circle is sized correctly - you want it to cover the lid, but not hide any of the globe. If the size it right you are ready to glue it down. Gluing isn't necessary, but makes the job easier. I gave the fabric a couple spritzes of this spray adhesive:

15. Just lay the circle on the lid and push the edges down. Take your length of ribbon and tie it around the lid. I sprayed one spot on the ribbon with as well just to help it hold better.

16. If you are positive the epoxy seal is dry you are ready to flip your globe and give it a shake! Now go be a stoner and put on some records while you lay on the carpet and play with your new toy.

1 comment:
Hi and thanks for the tut. We just made some christmasi ones. My kids are 5&3 and they love them.
Post a Comment